Claudia here with this final project featuring Glenda - the designer and owner of the boozybear etsy shop - and her fab steampunk chipboard pieces by showing steampunk/industrial style projects done by my wonderful DT - each using the same boozybear parts but in totally different projects and ways of using them.
I find the idea thrilling to see how differently the same chipboard pieces can be approached. I hope you do too. ;)
Boozybear Special I
Boozybear Special II
Boozybear Special III
Boozybear Special IV
Boozybear Special V
Boozybear Special VI
Boozybear Special VII
Boozybear Special VIII

So today it is my turn to share some boozybear inspiration - so here we go!

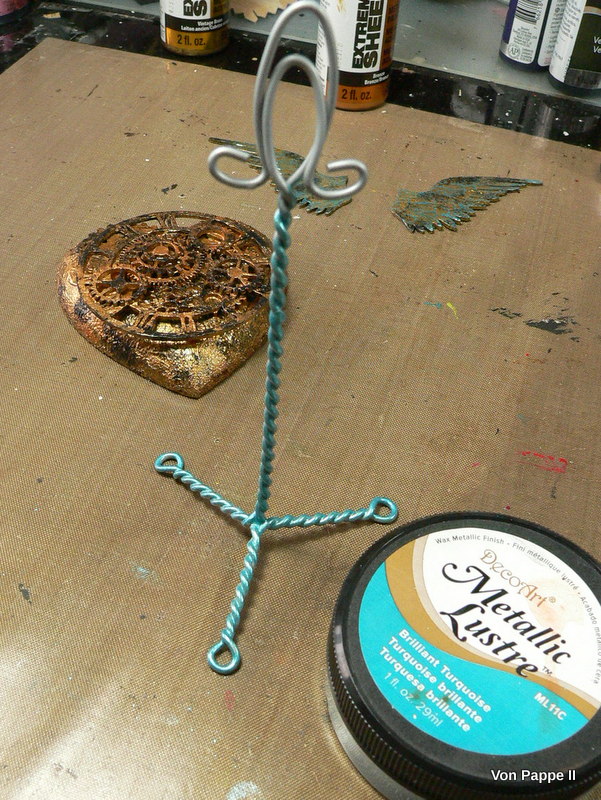
As you can see I didn't use the largest clockface pieces in the back, but the others immediately sparked the idea of a mechanical wind up heart with wings and a propeller.

The balsa wood heart and the old picture stand had been waiting in my stash quite a long time to be used....now was the time!

I started with adding a base coat of Raw Umber DecoArt Student Acrylic paint to the heart and painted the wings, key and propeller with DecoArt Extreme Sheen "Vintage Brass" and "Bronze".

Once dry I created a feather-y texture on the wings using DecoArt media Heavy Gel Medium and let it air dry.

I also used the Heavy Gel Medium to adhere the clock face and gears to the heart.

This is how the texture from the Heavy Gel Medium looked on the finished project:

While the assembled heart was set aside to dry I painted a quick coat of DecoArt matte Decou-Page to the stand to provide more tooth for some paint to adhere.

Once the Heavy Gel Medium on the wings had dried I applied some DecoArt Sparkling Turquoise Metallic Lustre to the raised areas using my fingertip.

The steampunk heart got a coat of Bronze Extreme Sheen that I stippled onto and inbetween the glued on pieces and the heart with an old and worn bristle brush.

Once the bronze paint was dry, I stippled on some DecoArt media Carbon Black fluid acrylic paint here and there.

I did the same with Quinacridone Gold...

...and to finish my steampunk parts off, I dry brushed them with a mix of Titan Buff and Prussian Blue Hue fluid acrylics.

The wire stand was treated pretty much the same...only that I started with the Metallic Lustre as a base coat instead of the Extreme Sheen.
I felt the wings and heart still looked too "clean" - so I added some white DecoArt media Crackle Paint to the wings with a palette knife...


...and sprinkles of Carbon Black, Turquoise and White Shimmer Mister to the heart:


The little propeller was fixed to the bottom of the heart using a round toothpick. I hand drilled the hole and inserted the toothpick with some glue.

Then it was time to assemble my flying wind up steampunk heart with matte Decou-Page.

The stand and the propeller came last.

Done!

Steampunk and hearts always go together so well, don't they?
I hope you've enjoyed the read and recommend you check out Glenda's wonderful range of chipboard pieces over at her boozybear etsy store!
***
Our January challenge is still open until the end of the month and I would love to see you play along! And if you haven't taken a look at the makes of Team A and Team B yet, I highly recommend you do so...loads of inspiration there to find! I promise ;)
Hugs and happy crafting!
Claudia
XXX
Love your review of what you have done. Great project. Hugs, Susan
ReplyDelete